Garmin’s Up Ahead feature informs you of upcoming waypoints which are relevant to you. It’s particularly useful for trail runners, ultra runners, and hikers who want to track their progress towards specific points like aid stations, water sources, summits and many more. It (optionally) shows up as a data screen during navigation.
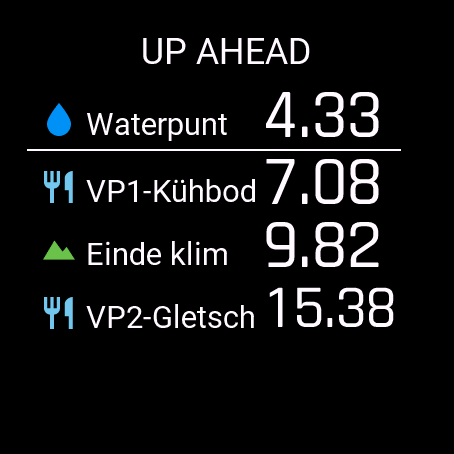
The Up Ahead screen will show the next four waypoints on the course, including the distance to reach them:
Technically these waypoints are course points, like turns. But most of the time, you won’t be interested in the next three turns. You want to know the distance to the next aid station or to the next water source. Thus, the up ahead feature filters out the course points which are turns, leaving only the waypoints. This is an improvement over Garmin’s earlier attempts with the time-to-next and distance-to-next fields, which did include turns.
Another advantage of Up Ahead is that the distance is calculated using the GPS track. This is especially helpful at longer distances, where the measured distance is different from the real distance. This is due to several reasons
- You do not run the perfect line
- The GPS measurement is inaccurate
- When you stand still at an aid station, the GPS measurements keep going and jumps around, adding meters
- maybe you go slightly off-course once or twice, by mistake or because you want to buy a chocolate milk
It is normal to measure 2-3% too much. Which does not seem much, but in longer races translates to kilometers. By the time your watch says 48k in a 50k race, you may think there is 2k to go. This will lead to disappointment when the finish is not in sight 2k later. When using the Up Ahead screen, it will show the real distance to the finish all the time.
Waypoints can be added using Garmin Connect. However, you will also get the useless turns added by Garmin. This issue was discussed in the previous article. Instead, I will add these into Plotaroute, my favorite route mapping tool.
In Plotaroute, course points (both turns and waypoints) are managed through the “Directions” menu. Turns can be added automatically and then fine-tuned. Plotaroute cannot guess the waypoints which are important to you, so that will become a manual task.

Add a new course point

Move the edit marker to the right location and click “Add directions here”

Edit the waypoint
- The directions/notes field is what you will see on your watch when approaching that waypoint
- Important: The turn arrow should be grayed-out (none). This, together with the symbol, makes the coursepoint a waypoint instead of a turn.
- The label name, position, size & color are just for plotaroute visualization itself, you will not see this on the watch
- The symbol should match the course point types which garmin allow in their fit file specification, see the table below.
- Confirm

When done adding waypoints and saving to a .fit file, there is one thing to avoid now. Do not send this file to your garmin watch using garmin connect. It will overwrite the turn directions. As we did in article #5, use another method. Upload the route to the watch bypassing Garmin Connect. I follow this procedure for every route:
- Create (or upload) a route in plot-a-route
- Optionally add or remove turns (and waypoints)
- Export the route as a fit file to the GRouteLoader pc app
- Import the route with the GRouteLoader widget on the Garmin watch (wirelessly)
See article #8 in this series for more details on bypassing Garmin Connect.
Are there any alternatives to this solution?
- Garmin Connect. If you can live with Garmin Connect’s main limitations (limited course editing options and inferior turn generation), this is the easiest way to add waypoints.
- Strava. The Strava route-builder is a premium feature, requiring a subscription. This is an expensive option which I have not tried myself.
The next article will zoom into one of the waypoint types, how to find the locations of the water sources.