As a trailrunner, I like adventures, being outdoors, discovering new trails and new places.
In this new blog series “Trailrunning with a (Garmin) GPS” I would like to share my experiences of navigating those trails with the help of my Garmin GPS watch, with at least the next articles:
#1 – Trailrunning with a Garmin GPS: Your Ultimate Guide
#2 – Unlocking Local Trails: The Power of OpenStreetMap
#3 – Komoot: A Trail Route Planner with Limitations
#4 – Best Trailrunning Route Planners: Why I Choose Plotaroute
#5 – Streamline Trail Navigation with Better Turn Directions
#6 – Plot Smarter: Custom Waypoints for Garmin’s Up Ahead Screen
#7 – Smart Hydration for Trail Runners: Create Your Own Water Point Map
#8 – Why You Should Skip Garmin Connect for Trailrunning Routes
What is the target audience for this series? First of all obviously those trailrunners who would like to get more out of their Garmin watch. Many Garmin runners are not using their watch to its full potential. I would like to offer my tips. But also the owners of other GPS sportswatch brands like Polar, Suunto, and Coros can find useful information here. They can explore articles on waymarked trails in openstreetmap (#2), on creating courses in Plotaroute (#4), and on finding drinking water (#7).
In this first article, I will introduce you to different ways of navigating. These approaches will help you follow a pre-planned route in an unfamiliar area. At the end of the article I will summarize the sometimes confusing Garmin terminology.
Marked trails
First of all, there are the trails where you are guided by markers. At a trail race those can be temporary, placed by the race organization. For this marked category, in theory no gpx files or GPS watches are required, simply follow the markers. Still, in reality those markers are occasionally missed, this happens to the best. I am always surprised to hear the stories of elite runners getting lost. This can easily be avoided with a GPS watch.
- Jim Walmsley getting lost at Western States in his first 100 miler
- Swiss alps 100 blog. It is about a runner who misses a turn. This mistake costs him at least two extra hours and 12 extra kilometers. It results in a DNF later that day.
- Cultra podcast episode #316, @37:00 about a front-of-the-pack runner. Jordan Buck gets lost multiple times during a race. He finally mentally gives up because of all those extra miles.
Sometimes markers are not there at all. They may be removed by other people for whatever reason. In those situations, a gpx file on your sportswatch is a convenient backup solution. It is sometimes necessary. Those watches will alert you when you go off-course. They prevent you from taking a wrong path for longer than about 100 meters. You only need a gpx file of the route. It is almost always provided by the race or by the organization owning the marked trail. And even when they only offer a map, a gpx file can always be created based on that map.
So unless you run the Barkley Marathons (no smartphones, no GPS watches), you can easily avoid situations like those linked above.
Unmarked trails
This is where your watch becomes your primary navigation tool. A smartphone can be used as a backup. Even a paper map can serve this purpose. But, on your watch, a small turn of the wrist is an efficient way for route guidance. In this situation you will need a route file, either
- Downloaded from the internet
- Created by yourself
Cheaper or older sportwatches will load the route file as a simple line to follow. Modern high-end GPS watches will also add maps to the track. This makes it far easier to orientate and to make the right decision at more complicated junctions.
By itself this is all you need. You will have to glance at your watch regularly. This helps to see if you are still on track and where to go at each junction. In the past, I went off-course many times. I was not focusing on the route while listening to an interesting podcast or talking to a friend. There are two ways of enhancing the navigation on the trails:
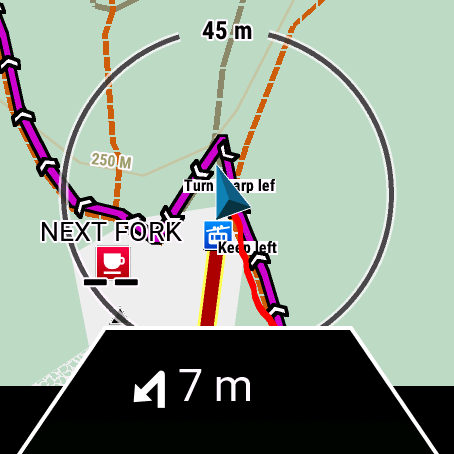
- Turn-by-turn information
You can add turn-by-turn instructions to the route, which basically makes navigation as easy as navigating your car. Your watch will show you: Next turn right in 1250 meters.
This means I now can run for a couple of minutes without looking at my watch. When the turn approaches the watch will vibrate and/or beep and tell me to take the next turn. - Voice guidance
Like in your car, voice guidance can be added. Now looking at your watch becomes fully optional. Your earphones will tell you: “Approaching sharp right turn”, followed by “Take a sharp right”, followed by “next turn slightly left in 830 meters”.
This has become my default way of navigating unknown trails.
Before we continue this series, I need to explain some Garmin terminology I will use in this series of posts:
Track
Tracks act like breadcrumb trails, allowing you to see where you or another individual traveled in the past. A track is a list of gps coordinates, together with other information like time and elevation. Tracks are normally stored in .gpx files. When you start an activity on your watch, the active track is shown as a (red) line on the map. A track is measured by GPS technology. GPS has an inaccuracy by definition. Thus, the track will never perfectly match the underlying trails on the map.

Recent garmin models are getting pretty close in normal circumstances. In difficult terrain such as canyons with steep walls or even when just standing still, the gps inaccuracy will increase.

Aid station stops can easily be recognized on a gps track. A stop can add 50-100 meters of distance. This is one of the reasons why in longer ultraraces the measured total distance is often more than the official course distance.
Courses & Routes
Where tracks are points recorded in the past, courses and routes are for future navigation. A course is a predefined path. It is created from a list of location points in the sequence you wish to navigate them. Courses are saved in a .TCX (human readable) or .FIT (binary) file format.
A route is similar to a course, but acts more like a car navigation system. It’s the end destination which matters, not the exact way to get there. If you miss a turn when navigating a course, you will get an “off-course” notification. But if you miss a turn when using a route, your watch will recalculate. It will use available roads and trails to try to get you to your next waypoint (or finish).
In all of my use cases, I use courses. I want to stick to my planned distance and trails. I prefer not to be surprised with re-routes. I do not want my watch to navigate me to an area I do not want to be. This is why I always recommend to set your navigation settings to “follow course”.
- Follow course: navigates the pre-planned course exactly as it was created, without recalculation.
- Use map: utilizes routable maps to navigate the course, recalculating the route if you stray from the original path.
Note: In this blog series, I will use the words course and route interchangeably. However, I always mean the Garmin course concept.
Ok, so courses are used for navigation. Let’s zoom in a little bit more. So a course is a list of location points. Most of these are just gps coordinates, but some of them are special, the so-called course points.
Course points are markers on a pre-planned course that give extra information or alerts to the user during navigation. These points can represent various locations like checkpoints, aid stations, or even specific turns. Older garmin watches treated all course points the same, but nowadays they make the distinction between two types of course points
- Turns, used for turn-by-turn navigation
- Waypoints, which are special locations like a food station, a water fountain or a summit. These are used by Garmin’s “Up Ahead” feature.
Finally, Points of Interest (POIs) are just points on the map, not related to any course or route. POI’s are visible on the map, can be searched and can be navigated to. Some use cases for POIs:
- Add a shelter to run to in case of bad weather
- Add specific landmarks, like a fire-tower, for easier navigation
- Add a supermarket to optionally visit in case of hot weather

In the next article I will discuss where to find trails and how openstreetmap can help.